Posts

Showing posts from February, 2014

Go, Go, Lego Racer!

Image
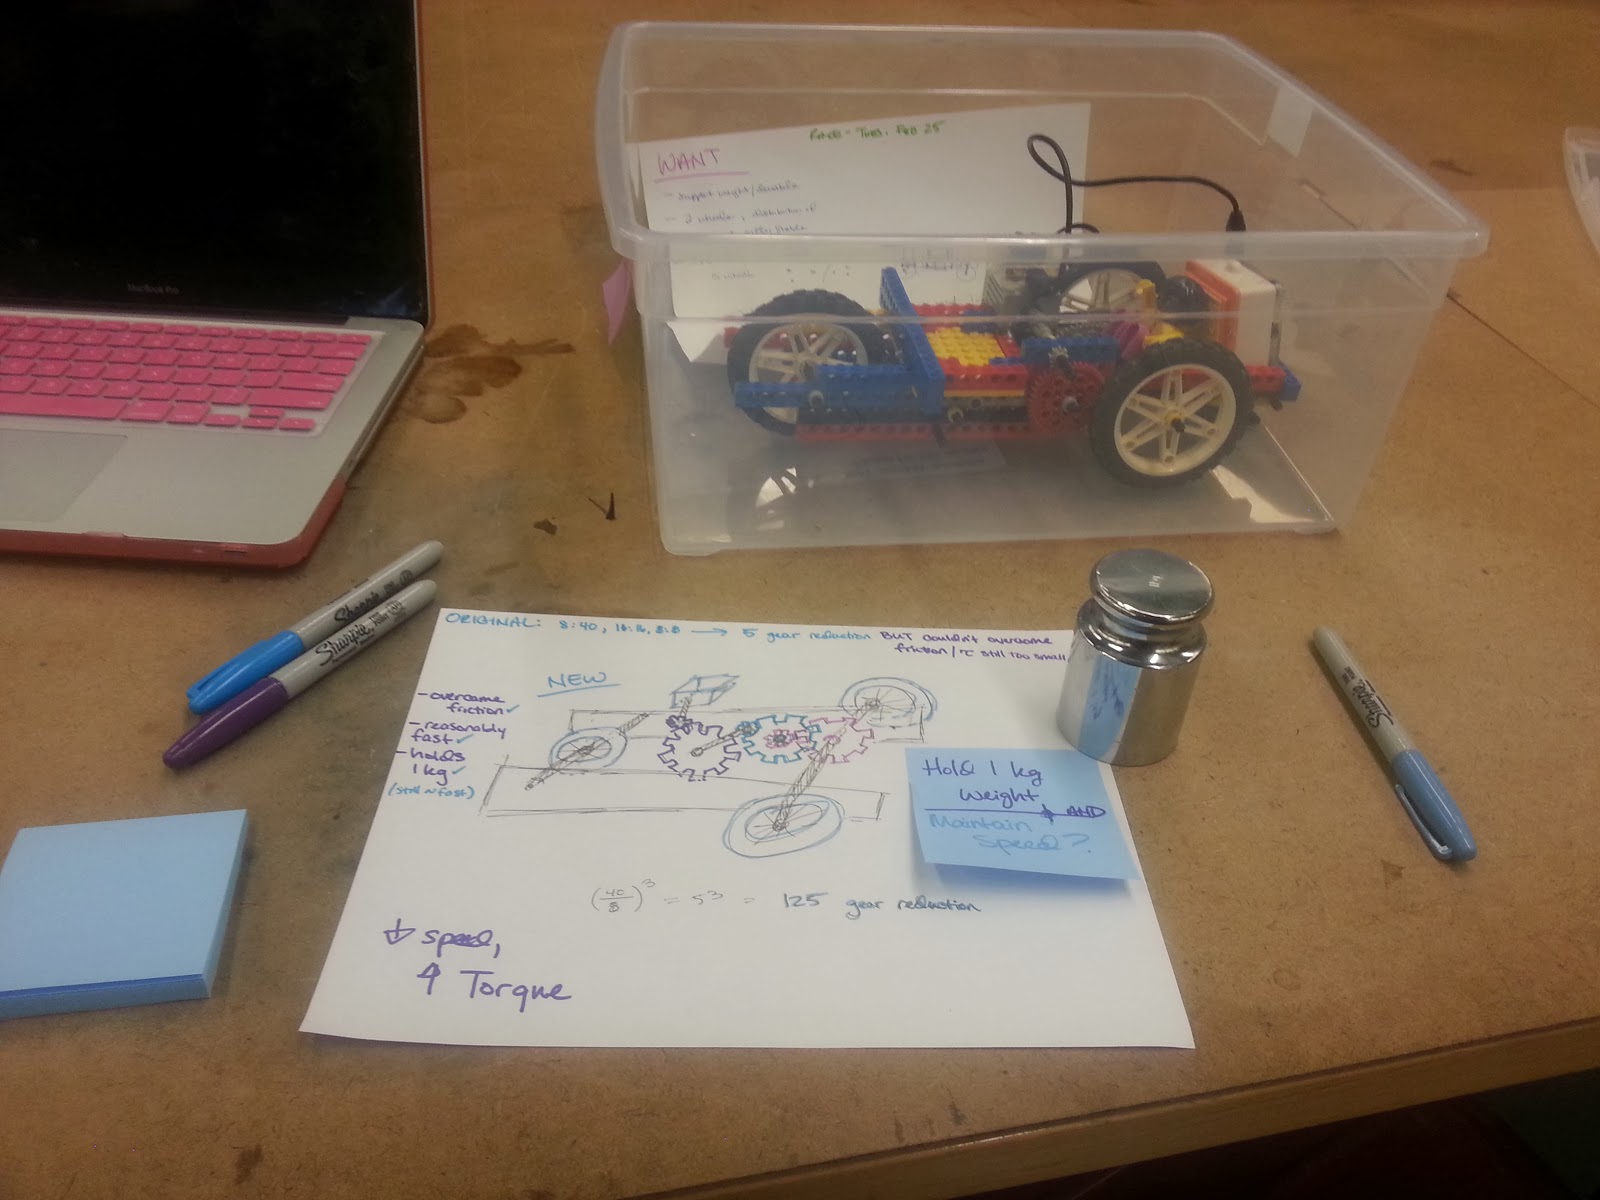
Objective: Discover the "magic" gear ratio to form a (relatively) fast Lego car that can carry a 1 kg weight in a race across a 4 m track. In our first iteration, we had trouble in getting our car to run. In our hands, the wheels would spin wonderfully but, once on the table, the wheels stalled. It then occurred to us what Professor Banzaert had said: "Torque is inversely proportional to speed." We finally figured out that, in order to produce enough power for the wheels -- or the torque -- to overcome the friction of the table (and later the 1 kilogram weight), we needed to decrease the speed. NOTE: Power is torque (τ) multiplied by angular velocity (ω)  or P = τ∗ω.  Also, τ =|F|∗|r|∗cosθ (F = mass of weight times gravitational acceleration 9.8 m/s^2), which translates for gears into |F|∗tanθ and ω=v/r (v = velocity and r = radius of the wheel). To decrease the speed, my partner and I had to increase the gear reduction ratio. Our first car had 3 pairs

Engineering Seminar: Prof. Kathleen Sienko

Image
For the third seminar from We-Lab this year, Professor Kathleen Sienko from the University of Michigan Biomedical Department presented on her work in design ethnography. As a person who does not follow biomedical engineering, I was enlightened by her talk and learned a lot about health issues and the need for revamped medical tools and practices in developing communities. I was intrigued by her discussion of the case study for the traditional male circumcision (TMC) and how it contains cultural significance in Uganda as well as health significance. (For one, I did not realize that TMC helps reduce HIV risk approximately sixty percent.) At first, I had a faint understanding of the term design ethnography, and I had to search for the definition to get a better understanding: "research designed to explore cultural phenomena" (1). Hearing of how she met with more than twenty-five focus group discussions, which included klan leaders, ceremonial cutters, circumcision candidat

Mechanisms Exploration

Image
Rotary Into Rectilinear Motion In exploring the various models that convert rotary motion into linear motion, I found that this model ( Model 042 ) to be the most intriguing. ( Model 046 came a close second.) I found this model the most interesting. One would think I would be attracted to the many shiny examples of gears or ratchet wheels. Let us not forget the Multiple Straight Line Drive . This mechanism fascinates me because of the design's incredible level of simplicity and ability to create complicated movement. In the video, the top model consists of two studs on a rotating disk. As they rotate, they strike an elbow-shaped lever, which moves the entire linear apparatus one way, and then the studs strike the plate on the other end to pull the entire apparatus in the opposite direction. One can vary the speed of this back-and-forth movement by varying the radius of the disk (or the interval between the first stud's hit and the next stud's hit).  The lowe

The Well Windlass

Image
For assignment #2, students were given the task of creating a well windlass from laser-cut Delrin sheets to lift a bottle (our "bucket") from the floor and 10 cm above the table top.  My partner Kat and I considered how to include a cranking mechanism, pulley systems, and a stable base for such weight. The requirements: 1) The mechanism could only use 500 sq. cm of Delrin and 50cm of rod. 2) Had to span a gap of 12 cm and be able to lift the top 10cm of the bottle above the tabletop. 3) Had to support a 1 liter bottle of water without wobbling or breaking. During our brainstorming session, we came up with 2 ideas: an obvious, traditional crank using the rod as a spindle and a cracking mechanism based on a pulley system. The latter seemed more suitable as 1) the rod is not durable enough to remain straight with the weight of the bottle and 2) Delrin has a low coefficient of friction, which is attractive for a pulley system. Given the restrictions of a 500 cm^2 sheet o

Laser-Cut Bottle Opener (3 of 3)

Image
3rd Design: With limited time and a failed second iteration , my partner and I hoped to resolve the dimensions issues and modify the design. A few things we noted: -- The lamp pole wasn't the best handle. We needed some sort of curve to aid grabbing the bottle opener. -- The arms were too weak and tiny but we liked the idea of a similar lift; maybe we needed a larger hook and another point of leverage. -- The base of the lamp (the bottom opening) appeared that it would work if it had been printed to scale. So we wouldn't mess with that portion of the design. We returned to SolidWorks and modified our design, by eliminating the bottom arm and forming a more exaggerated upper arm/hook. We added a little bump on the pole to make a better handle (similar to the curves on the first design -- the "Bottle" bottle opener). However, again, when we sent it to the laser printer, our drawing was scaled down about half or more. [ A note on SolidWorks: After remeasuring and

Laser-Cut Bottle Opener (2 of 3)

Image
2nd Design: We had a "meh" prototype in the first design , so my partner and I took new measurements and decided to shrink the height of the opening to half the size and add a dent in the opening for the flaps to grab on. Furthermore, as the engraving wasn't as visible as we had hoped, we wanted to challenge our aesthetics skills and create a more "Wellesley" design. We drew inspiration from the recognizable "Wellesley lamp." In Solidworks, we created a similar opening to the first design, decreased the height and added a rectangular dent below it for flaps to grab onto it. Additionally, we looked back on our brainstorming idea #1 of the slim bottle opener with the jaw-like opening. We decided to add that to our design as a second alternative if the trapezoidal opening gave trouble. We measured the bottle cap one more time to figure out how long the top arm should stretch across the bottle cap and how long/angled the bottom arm should be in or

Laser-Cut Bottle Opener (1 of 3)

Image
The first week of classes we were given an assignment to create a laser-cut bottle opener -- two in fact. Objective: To be able to laser-cut a 2D shape out of Delrin sheets and use it to open actual soda bottles. Brainstorming : How to Open and What it Should Look Like With past experiences with bottle openers, it seems that most try to use a level approach: there's pressure lifting one of the flaps while another point (or points) is applied on top of the cap to keep it in place. Most of my brainstorming ideas were inspired by my bottle opener back home -- it is quirky, compact and functional (look to left). A few ideas that we came up involved similarly closed openings but also jaw-like fixtures. My partner and I came close to 15 ideas in 5-10 minutes but we went through them all to select our top 3 favorites (in no particular order):  A slim bottle opener with a jaw-like fixture to be fit across and under the bottle cap A trapezoidal-shaped closed opening with a simple

A Lesson in Fastening and Attaching

Image
Heat Staking Machine Tuesday, in class, we had what I would call our first formal lesson in engineering fundamentals. I learned a few ways of attaching and fastening materials, namely piano wiring, laser cutting and press fit, heat stakes and bushings. Interestingly enough, I've seen many of these methods and did not know what to call it. Relative benefits and drawbacks of each: With piano wiring, you can either drill a fitted hole so that the pieces do not move or you can have a loose hole to make a hinge.  In both cases, if you do not measure the correct diameter (or length) of the wire, things can become messy. Additionally, although it is a strong attaching mechanism, if the holes in all the pieces are not aligned properly (or if the wire itself is not straight), the method will not work. Let's hope it does not become stuck in the holes. With laser cutting/press fit, you make openings to the exact dimensions of the piece you're inserting. Surprisingly, pres

Welcome to ENGR160!

Image
Photo Credit, Arthur Pierson Second semester first-year, here. My name is Christina Holman and welcome to my engineering portfolio. If you click on the About Me , you can read even more about why I have this blog. With a start of a new semester, I am starting ENGR160 Fundamentals of Engineerin g, and I am excited -- ecstatic rather -- to take my second academic step towards becoming an engineer. Whereas Product Creation for All  -- the first-year seminar I took with Prof. Banzaert last semester -- was a simple introduction to design concepts and an exploration for all, Fundamentals of Engineering covers exactly what it says: the fundamentals . If I master those, it really means I have a foundation to build on. I never shy away from telling people about my dream and my love for applied physics/engineering: I am a prospective dual major in Economics and (Electrical) Engineering . I absolutely plan on pursuing either the MIT or Olin engineering program, while covering the